Authentication
Overview
The Dexcom API uses OAuth 2.0 to enable client applications to make requests on behalf of users. Users authenticate themselves with Dexcom and do not enter their login information into the client application directly. Users also authorize a specific scope of data that may be transferred from Dexcom to the client application and can revoke the access at any time.
It is standard practice to use a pre-built OAuth 2.0 client library instead of writing one from scratch. Libraries are available for a wide variety of languages; many can be found at https://oauth.net/code/
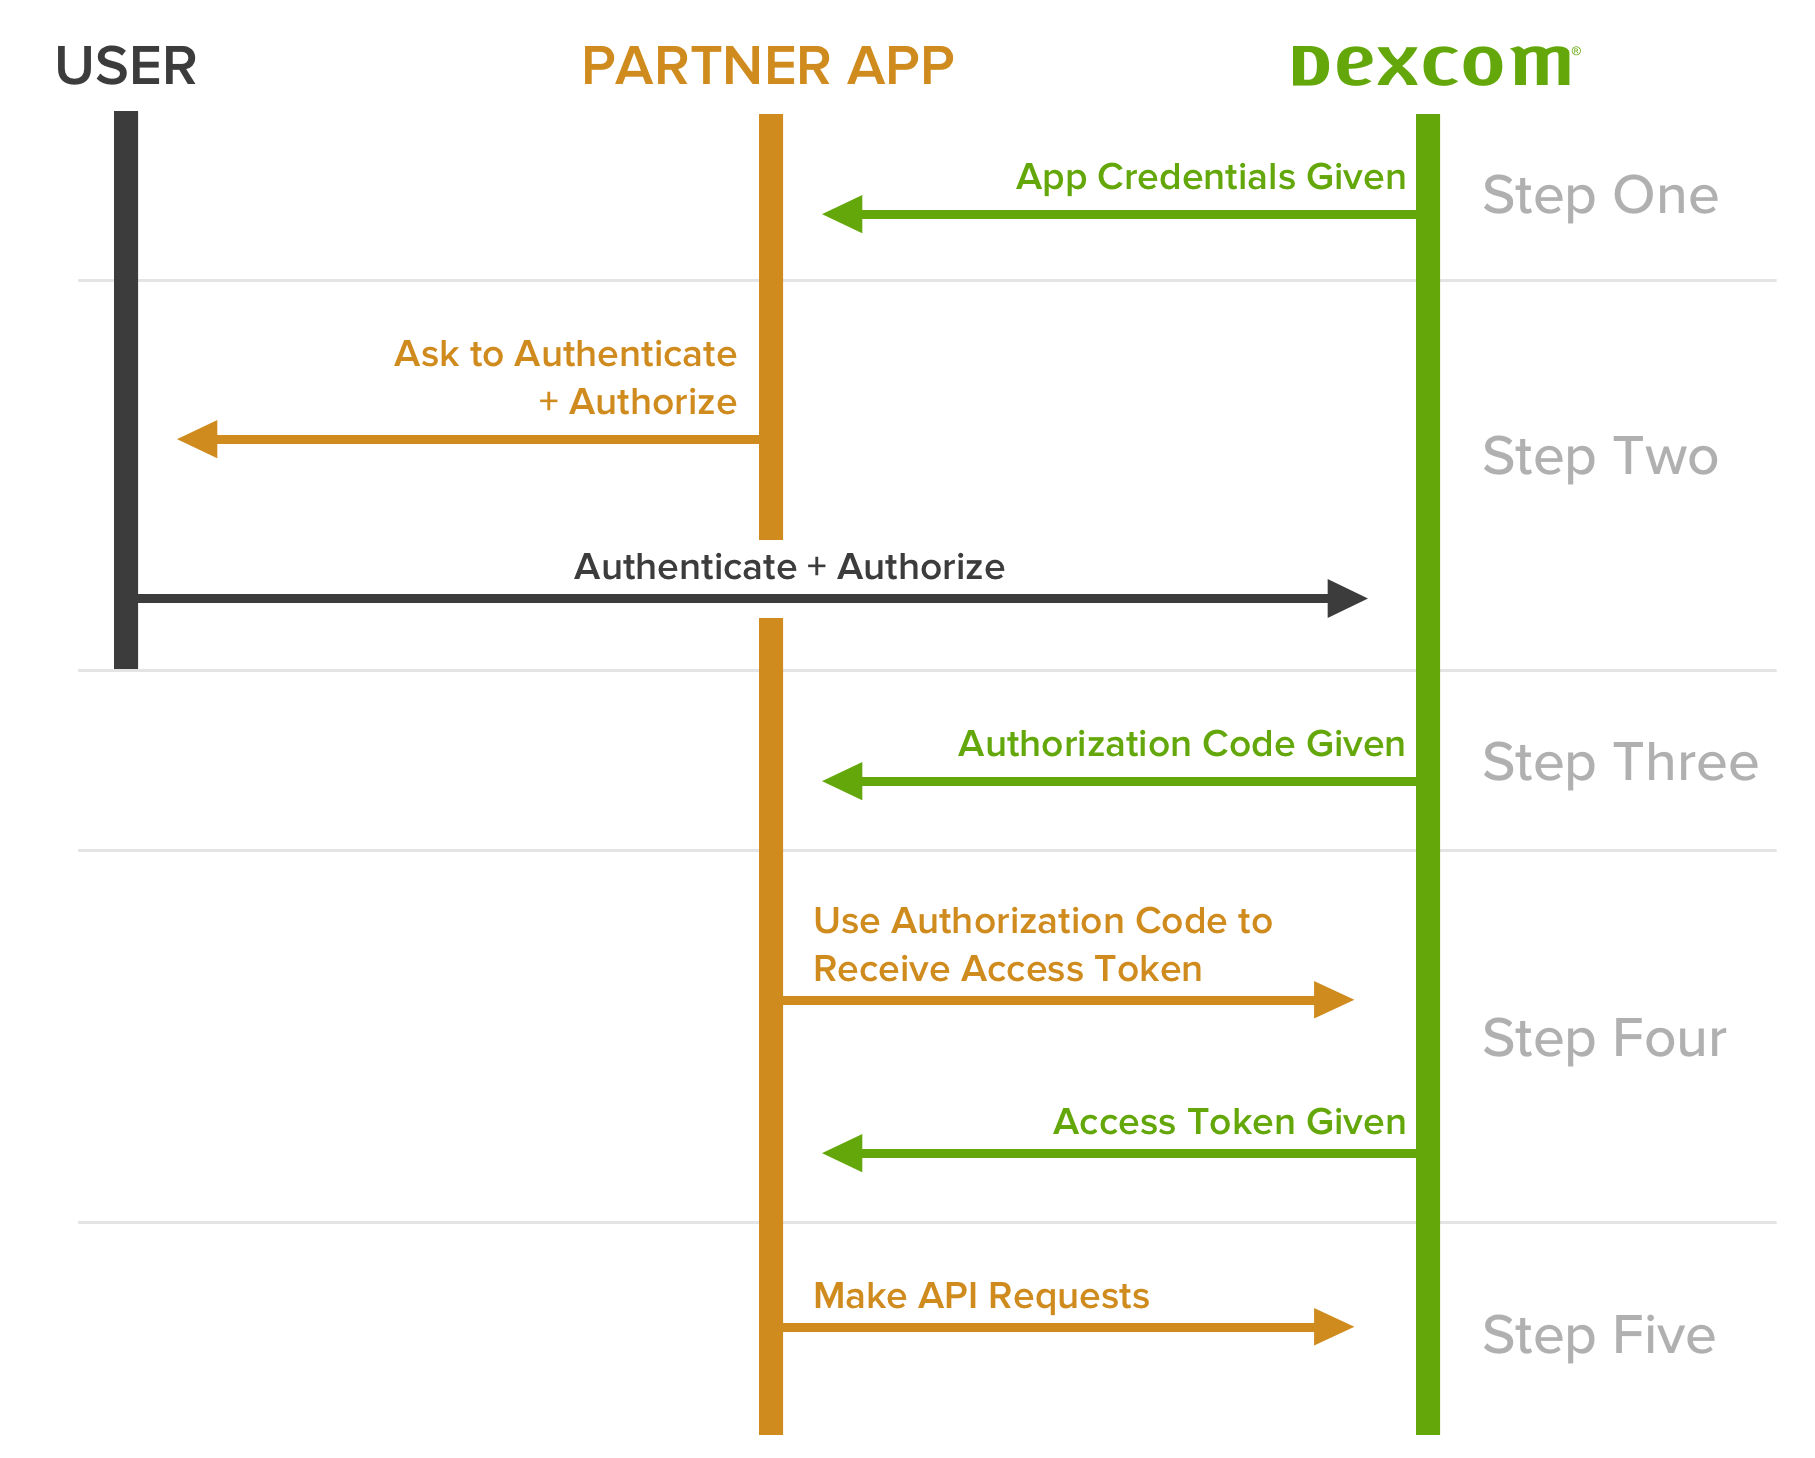
Diagram shows an overview of the authentication and authorization flow:
This walkthrough goes over the basics of the authentication process as it applies to the Dexcom API but is not a comprehensive introduction to OAuth 2.0. The following references provide detailed information on the principles and implementation of OAuth 2.0:
Step One: Obtain Application Credentials
All applications have credentials that enable them to make requests. To obtain these credentials, register as a developer and create an app. New credentials are generated for each app and can be found in the app management section.
| Parameter | Description |
|---|---|
| client_id | The unique ID for the client application—similar to a username |
| client_secret | The secret for the client application—similar to a password |
An application's client_secret should never be shared or distributed. If it is compromised, you can generate a new one in the app management section, which will immediately invalidate the old one.
Step Two: Obtain User Authorization
The application directs the user to the Dexcom login page using the following URL:
https://api.dexcom.com/v2/oauth2/login?client_id={your_client_id}&redirect_uri={your_redirect_uri}&response_type=code&scope=offline_access&state={your_state_value}When targeting the sandbox environment, the base URL above should be replaced with https://sandbox-api.dexcom.com
The query parameters are described below:
| Parameter | Description |
|---|---|
| client_id | The unique ID for the client application—similar to a username |
| redirect_uri | The redirect URI associated with the application; must match the one specified in the app management section |
| response_type | The OAuth 2.0 response type; currently, code is the only acceptable input |
| scope | The access scope being requested; currently, offline_access is the only acceptable input |
| state | Client-generated value used to maintain state between the request and the callback; used to prevent cross-site request forgery (CSRF) (optional) |
See the Authorization Request section of the RFC 6749 OAuth 2.0 Authorization Framework standard for more details on these parameters.
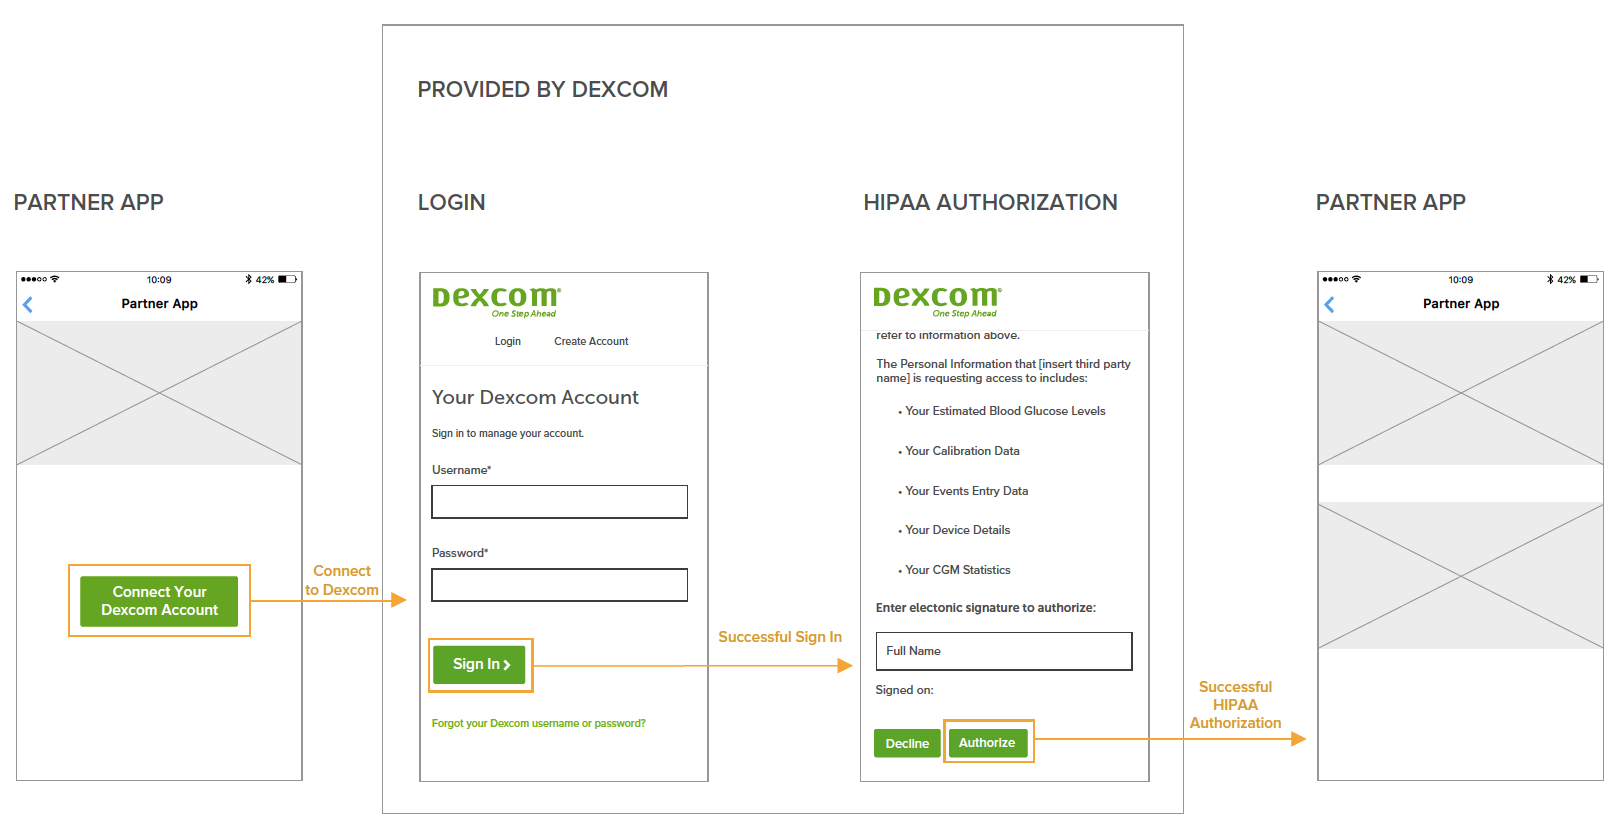
The CGM user will first see the Dexcom login page, where they will enter their Dexcom username and password. The user's credentials are not passed to the client application. After authenticating, the user will be presented with a HIPAA authorization statement. This authorization is required so that the user explicitly grants Dexcom the right to share his or her data with the client application. The basic flow of this process as it appears to the user is illustrated below:
Step Three: Obtain Authorization Code
Upon successful authentication and authorization by the user, an HTTP 302 (redirect) will be returned, and the authorization_code will be appended to your redirect_uri. For example, if your redirect_uri were https://example.com, the redirect will be to https://example.com?code={your\_authorization\_code}&state={your\_state\_value}. Extract the authorization_code from the URL for use in the next step. Note that the authorization_code is single-use and expires after one minute. The optional state parameter will be returned only if it was used in Step Two.
If the user denies access in Step Two, the redirect_uri will be appended with ?error=access_denied instead of the authorization code.
Step Four: Obtain Access Token
The authorization_code acquired in Step Three can now be exchanged for an access_token and a refresh_token. The endpoint used for this exchange is:
https://api.dexcom.com/v2/oauth2/token
When targeting the sandbox environment, the base URL above should be replaced with https://sandbox-api.dexcom.com
The form parameters are described below:
| Parameter | Description |
|---|---|
| client_id | The unique ID for the client application—similar to a username |
| client_secret | The secret for the client application—similar to a password |
| code | The authorization_code obtained in Step Three |
| grant_type | To obtain an access token using an authorization code, use a grant type of authorization_code |
| redirect_uri | The redirect URI associated with the application; must match the one specified in the app management section |
The Content-Type field in the header should be set to application/x-www-form-urlencoded
Here's an example of obtaining an access_token using an authorization_code:
- Payload
- curl
- C#
- JavaScript
- Java
- Node.js
- PHP
- Python
- Ruby
curl -i -X POST \
  https://api.dexcom.com/v2/oauth2/token \
  -H 'Content-Type: application/x-www-form-urlencoded' \
  -d grant_type=string \
  -d code=string \
  -d redirect_uri=string \
  -d client_id=string \
  -d client_secret=string
The response will look like:
{- "access_token": "{your_access_token}",
- "expires_in": 7200,
- "token_type": "Bearer",
- "refresh_token": "{your_refresh_token}",
- "not-before-policy": "1726871301,",
- "session_state": "65a415bf-25ad-4e0a-8381-1b78db6a8ea7"
}The expires_in value is expressed in seconds.
Step Five: Make Requests Using Bearer Token
Using the access_token, the client app can now make API requests on behalf of the user by passing it in the authorization header. Make sure to specify Bearer as the type. Below is an example request to the /egvs endpoint; see the Endpoint Overview section for the different available resources.
- curl
- C#
- JavaScript
- Java
- Node.js
- PHP
- Python
- Ruby
curl -i -X GET \
  'https://api.dexcom.com/v2/users/self/egvs?startDate=2023-01-01T09%3A12%3A35&endDate=2023-01-01T09%3A12%3A35' \
  -H 'Authorization: Bearer <YOUR_TOKEN_HERE>'
Step Six: Refresh Tokens
The access_token acquired in Step Four has a limited usage time, as indicated by the expires_in field. The refresh_token can be used to acquire a new one. The endpoint used for this exchange is:
https://api.dexcom.com/v2/oauth2/token
When targeting the sandbox environment, the base URL should be replaced with https://sandbox-api.dexcom.com
The form parameters are described below:
| Parameter | Description |
|---|---|
| client_id | The unique ID for the client application—similar to a username |
| client_secret | The secret for the client application—similar to a password |
| refresh_token | The refresh_token obtained in Step Four |
| grant_type | To obtain an access token using a refresh token, use a grant type of refresh_token |
The Content-Type field in the header should be set to application/x-www-form-urlencoded
Here's an example of obtaining an access_token using a refresh_token:
- Payload
- curl
- C#
- JavaScript
- Java
- Node.js
- PHP
- Python
- Ruby
curl -i -X POST \
  https://api.dexcom.com/v2/oauth2/token \
  -H 'Content-Type: application/x-www-form-urlencoded' \
  -d grant_type=string \
  -d code=string \
  -d redirect_uri=string \
  -d client_id=string \
  -d client_secret=string
The response will look like:
{- "access_token": "{your_access_token}",
- "expires_in": 7200,
- "token_type": "Bearer",
- "refresh_token": "{your_refresh_token}",
- "not-before-policy": "1726871301,",
- "session_state": "65a415bf-25ad-4e0a-8381-1b78db6a8ea7"
}Each refresh_token can be used only once. When it is exchanged for an access_token, a new refresh_token will be issued and the one that was used will be invalidated. Make sure to capture the new refresh_token and replace the old one with it. Each refresh_token is valid for a maximum of one year.
Revoking Tokens
Users can revoke their authorization at any time at Dexcom.com by signing in to their account and changing their authorizations in Permissions. Dexcom will promptly terminate providing further personal information to the client application, but any information previously provided to the app will not be affected by this revocation.
Handling Errors
Apps should be developed to properly catch HTTP response status codes other than 200 and proceed accordingly.
If a status code of 401 is returned on a request for data using an access_token, the next step is to use the refresh_token to acquire a new access_token.
If a status code of 400 is returned when exchanging a refresh_token, that refresh_token is no longer valid. Potential reasons include but are not limited to:
- the user has revoked the app's authorization
- the user has reset their Dexcom account password
- the refresh_token has expired
- the refresh_token has already been used and is therefore no longer valid
- the refresh_token has been invalidated due to unforeseen circumstances
Independent of the reason, it is best to proceed by prompting the user to re-authorize the application by redirecting them to the login as detailed above in Step Two.
A complete list of errors and explanations is available in the Error Response section of the RFC 6749 OAuth 2.0 Authorization Framework standard.